The Golf Course
Welcome to our Golf Course!
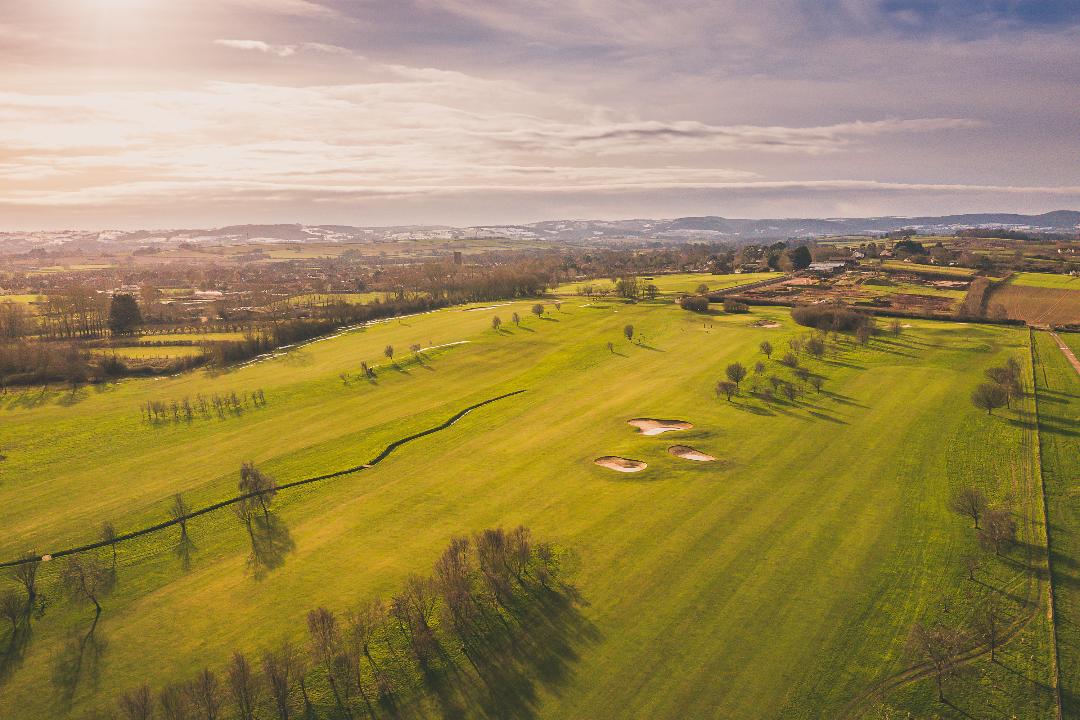
Our nine hole, 18-tee golf course is said to be one of the best in the South West and offers splendid views of the nearby Quantock Hills. Cannington is ideal for all abilities providing a good test for established golfers and developing new players and improvers.
Designed by renowned course architect Martin Hawtree of Oxford, who also designed the Donald Trump Golf Resort in Scotland, the course (6,072 yards, par 68) is built to the highest international specification and is well-known for its excellent condition.
The open fairways offer new players the chance to concentrate on their shots, whilst the subtle contours of the course provide a satisfying round of golf for those improving their technique.

Hole 1, 350 yards, Par 4
An opening hole full of choice with its upper and lower fairway separated by the bunker at the 230 yard point and a strip of rough.
For the low handicapper there is a touch of risk and reward, in that if the golfer is prepared to take the out bounds on the left and the bunker on the short of the left hand corner of the green, it is possible to drive the green. Failing that, a short pitch to the green with a full view of the flag is all that would be needed to make the green.
For the not so brave, playing the ball to the lower fairway is the best option; this does make for a more challenging second shot, up to the elevated green, where the bottom of the flag cannot be seen. A golfer taking this approach to the green needs to consider that it is further than it looks.
Hole 2, 184 yards, Par 3
The first of six challenging par 3 holes. What the golfer sees is what the golfer gets. Usually a left to right wind tends to blow the shot towards the cavernous right hand bunker.
Hole 3, 509 yards, Par 5
A relatively easy three shot to the green par 5. Downhill all the way, but be wary of the ditch about 40 yards short of the green. The wind again comes into play here for the scratch golfer; getting up in two shots is definitely on and making a Par can feel like a bogey.
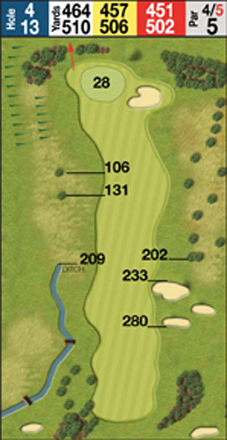
Hole 4, 464 yards, Par 4
Currently the stroke one hole and the toughest par 4 of the front nine holes although quite straight, it is up hill and into the wind. Bunkers guard the fairway at the 230 yard mark, with the ditch on the left separating the fourth and third holes. The green is set into the hill and is framed by mounds at the sides and back with another Hawtree large bunker on the right hand corner of the green. For the long handicapper it is really a three shotter and playing for a five is the best option.
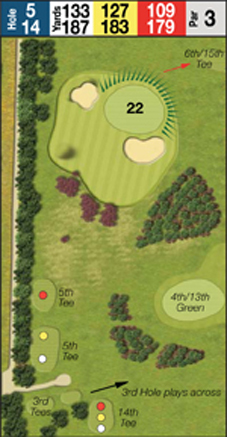
Hole 5, 133 yard Par 3
On the face of it, for the scratch golfer an easy par 3 hole; but care is required with the strong prevailing wind that blows left to right – it is easy to come up short and be blown into the bunker protecting the right hand side of the green. This hole can be a ‘little monster’ to the longer handicap golfer, with the gorse bushes just in front of the tee.
Hole 6, 434 yards, Par 4
A good par 4 with out-of-bounds all down the left. With the tee set close to the out-of-bounds fence, a hooked shot here can destroy a confident start. For the better golfer, taking note of where the pin is cut on the green really determines the tee shot like no other hole on the course.
The green is guarded by another huge bunker on the left and one just short of the green on the right. Added to this is a bunker well to the right of the fairway set at 171 yards to the front of the green. The hole position dictates the play; for the better player should the hole be cut back right, it is best to approach the green from the right side of the fairway to give a full view of the flag.
Should the hole be cut back right or front right, the better player needs to skirt down the left hand side to give a clear approach to the green. The challenge here is that it brings the out-of-bounds fence into play, so care is needed.
Hole 7, 164 yards, Par 3
This hole has more ‘fours’ scored on it then any other of the par threes. The pond well to the left has proved a challenge for the long handicap golfer and perhaps it may look too easy for the scratch golfer. What you see is what you get, however wind changes can affect ‘clubbing’ dramatically. Play for the heart of the green and make a par.
Hole 8, 482 yards, Par 4 (Par 5 from the Yellow Tee)
With the new back tee coming into play this season, this a monster par 4 for the club golfer – hence from the yellow tees it is played as a par 5.
The scratch golfer these days looks to birdie par fives which makes a par round easier in the mind to achieve, hence this has been kept as a par 4. It is really the only ‘heroic’ hole on the course with cutting the corner with the tee shot too much to resist, although the penalty will be a ‘reload’ with trees and out-of-bounds all along the left. A successful drive here will leave a mid to short iron into the green. It does play up hill and into the prevailing wind which for the club golfer it is best played as a ‘five’.
A feature at the green is another cavernous bunker that puts the ball well below the green; getting the ball out is a priority for the unfortunate.
Hole 9, 358 yards, Par 4
It would pay the golfer to look at the pin position before starting the round, as again, the hole being strategic in nature, the position of the pin determines for the scratch golfer the best line to take for the drive.
With trees and a bunker at the 220 yard mark obscuring the right hand side of the green, should the pin be placed on this side of the green, the drive needs to go down the left side of the fairway to open up the approach to the green.
The more difficult drive is when the pin is cut to the back left of the green; to get a full view of the pin the drive needs to go as tight to the right as possible over the 220 yard bunker and trees. The prevailing head wind does increase the challenge to the hole.
Hole 10, 372 yards, Par 4
With the second time around this nine hole course, the different tee positions change the golfer’s consideration as to the best line to take from the tee. It is the tee shot that alters significantly on most of the back nine holes, when compared to the front nine, the tenth is no exception. The fairway bunker comes more into play for the scratch golfer on what is predominantly a drive and wedge hole.
Hole 11, 145 yards, Par 3
The golfer is presented with a different look to the green compared to the second tee shot. The large bunker on the right of the green is more in the player’s vision. However as only a short iron is needed, hitting the green should not present too much of a problem. The distance can deceive so make sure enough ‘club’ is taken.
Hole 12, 460 yards, Par 4
A testing two shotter for the scratch player should there be a head wind, otherwise what you see is what you get. The club player needs to consider whether to ‘layup’ short of the ditch that runs across the fairway, forty yards from the green.
Hole 13, 510 yards, Par 5
A challenging par 5, up hill and into the prevailing wind, from this tee. The group of bunkers at 230 yards from the tee on the right hand side come into play, in particular the second bunker which is 277 yards from the tee just waiting to catch the scratch player’s drive. The fairway tends to ‘gather the ball’ in to this bunker. The ideal line is to keep as tight as possible up the left hand side of the hole to have a full view of the green for the second shot.
Hole 14, 187 yards, Par 3
A deceiving tee shot as the green is well below the golfer with a large bunker on the right protecting two thirds of the green. When the pin is cut into the right hand half it is hidden by a copse of trees and a left to right flight is required to get close. However as the prevailing wind is also left to right there is a danger of the ball being blown away from the green in to the rough, leaving a tricky shot to an elevated green. If the fade shot becomes a pull then there is another very deep bunker on the left hand side of the green. For the long handicap player the gorse must be carried at least, as there is no ‘bail out’ area on this one.
Hole 15, 405 yards, Par 4
Played from a shorter more central tee than at the sixth, the bunkers on the right 234 yards out from the tee are waiting to catch the cut drive. The danger for the second shot is the out-of-bounds fence which is right behind the green; any thinned shot by the club golfer could run through the green and go through the fence marking the out-of-bounds.
Hole 16, 188 yards, Par 3
A much longer hole second time round and with the tee also positioned further to the right it brings into play the pond and the out-of-bounds on the left of the green. With the prevailing wind coming from left to right, the golfer with a tendency to hook the ball could be in trouble. All the hazards can be seen from the tee and this hole does play on the mind, in particular for the long handicapper.
Hole 17, 406 yards, Par 4
Although this one is much shorter second time round, the trees immediately to the right of the tee can cause problems for the long handicapper. The out-of-bounds looks straight at you from the tee on this slight right to left dog leg. This should be a straight forward hole; the long handicap golfer should play for a five and may indeed end up with a par.
Hole 18, 367 yards, Par 4
Slightly longer than the 9th hole, a more open view of the fairway can be seen from the tee. Again, depending on where the pin is cut, the correct line for the tee shot is a must if the golfer wants to avoid a tricky pitch into the green, especially if the pin is cut front left, then there are two bunkers to fly to a tight landing zone. In this case the best line for the tee shot is as tight to the right hand side of the fairway as the golfer can get, leaving a wide open green with a great chance of a birdie.
The opposite is true if the pin is cut front right; this brings into play the bunker at the front right of the green. This time a drive up the left hand side of the fairway is required, however watch out for the trees all the way up the left hand side – easy to score a bogey if caught up in those.
- Holes 1 & 10
- Holes 2 & 11
- Holes 3 & 12
- Holes 4 & 13
- Holes 5 & 14
- Holes 6 & 15
- Holes 7 & 16
- Holes 8 & 17
- Holes 9 & 18
Next Events See all events...
Latest News See all news...
© 2026 Bridgwater & Taunton College, Bath Road, Bridgwater, Somerset, TA6 4PZ, United Kingdom | Terms / Privacy / Cookies | Accessibility Made by Wave
How we use cookies: This website uses cookies so that we can provide you with the best user experience. To read more about the cookies we use, read our Cookies Policy.


